Tuesday, December 27, 2011

Install Windows XP on SATA without a Floppy (F6)

0 comments


SATA hard drives have become more and more appreciated tending to substitute the IDE drives due to the increasing speed they offer. Motherboard manufacturers started to implement the new standard years ago, when the technology was young and expensive. Now, as the SATA HDD prices have lowered to a level where anybody can afford to choose a SATA enabled HDD instead of an IDE one, a great migration has been observed among the common computer users.


They choose to install Windows and applications on SATA drives because they provide more speed which determines the system to run smoother. Thus, for those owning older mainboards with SATA support an extra step is required while attempting to install Windows XP. Windows XP does not provide drivers for all the SATA controllers, therefore, during the installation procedure, the user must insert a floppy with the drivers that came in the package along with the motherboard.


Not a big deal, not much effort, but the funny thing is that a great number of people passed on their floppy drives. Under these circumstances, no floppy means the impossibility to install Windows XP on SATA (on some mainboards). The result? The installation guide simply won't detect the SATA HDD.


People that were happy they got rid of the old removable drive have now motives to worry. Some may reconsider buying new floppy drives for their computers. Even if I wrote in a precedent article about the utility of the floppy drive, I do not encourage spending your money buying back an obsolete piece of hardware. I will present you a method to avoid this inconvenient by doing a software trick.


Let's take it slow. Where is the problem? We have a driver problem strictly because the SATA driver we need does not come embedded in the Windows XP installation package. What if we add the driver by ourselves before installing Windows?


What ingredients are involved in this operation? The original Windows XP Installation CD, a freeware application named NLite and a blank CD. Moreover, we need the drivers for the SATA controller provided by the manufacturer. In case you did not find any floppy inside the motherboard package or you cannot locate them on the mainboard installation CD, you can consult the manufacturer's website to download the latest versions. To do the trick I have been talking about, it is assumed that you already have a Windows installed on an IDE drive. In case you don't, pay a visit to a friend and ask him to let you use his computer. It won't take too much time, I guarantee.


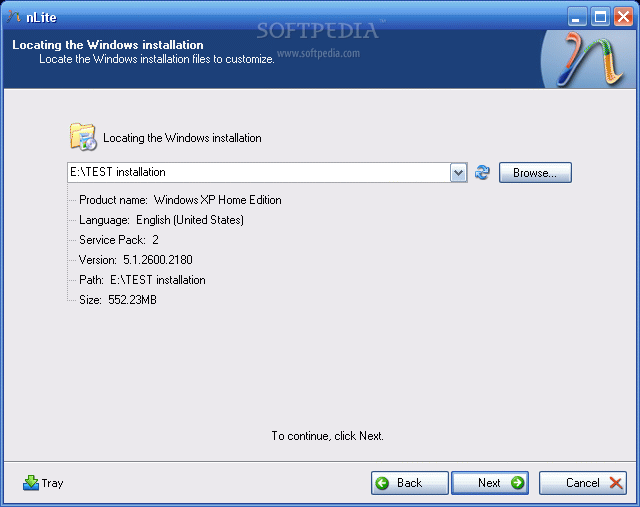
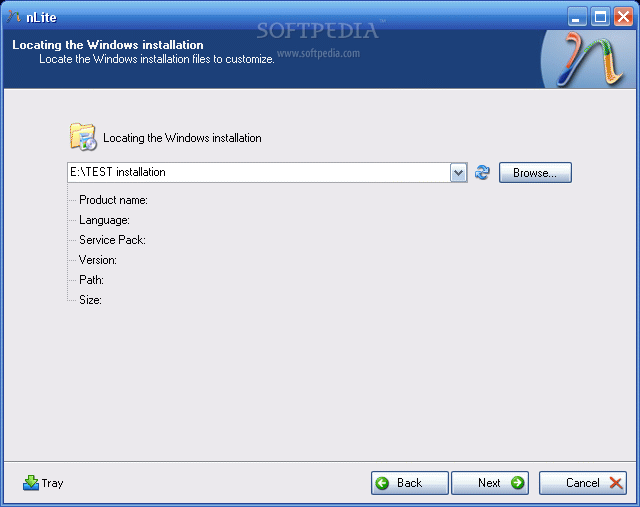
So, download the drivers and unzip them (in case they come archived) in a desired location. Then download and install the Nlite application. When you start the Nlite application, you will be asked to provide the location for the Windows installation package. Insert the genuine Windows Installation CD into the CD drive and, inside the application, select the CD drive letter.


To insert the SATA drivers within the installation package, you need to have it saved on the HDD. Hence, when the warning window appears click OK and select the destination folder for the files to be saved. Make sure that the destination partition / HDD has enough space to store the contents of the installation CD.


I tested a Windows XP Home Edition and it seems that it required about 566 MB. Immediately after you have chosen the destination folder, the application will start copying the Windows installation files. When finished, it will display some version information regarding the newly copied Windows Installation Package.


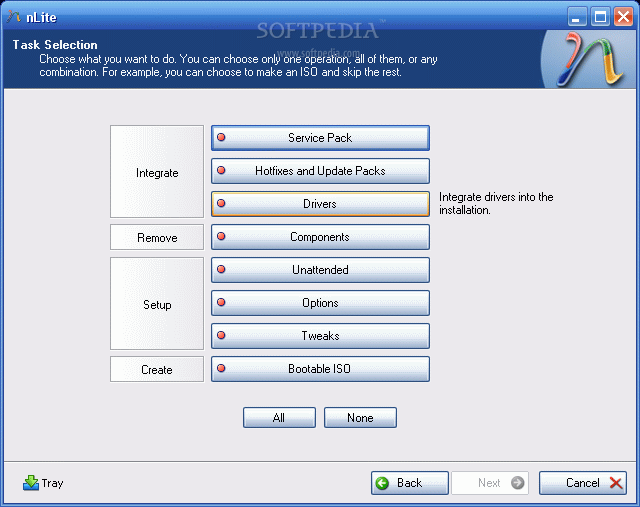
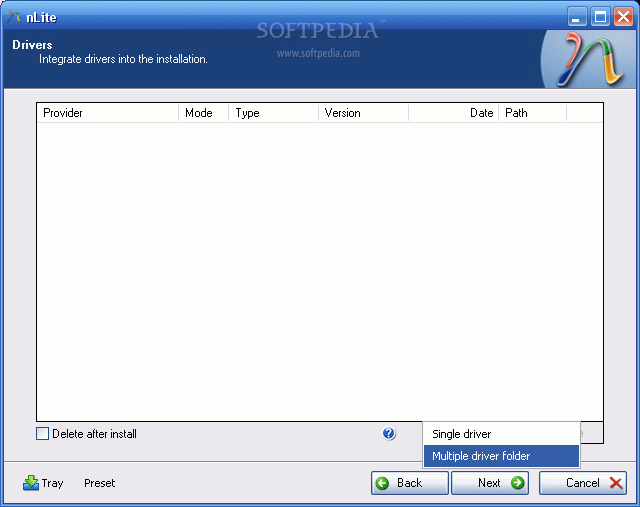
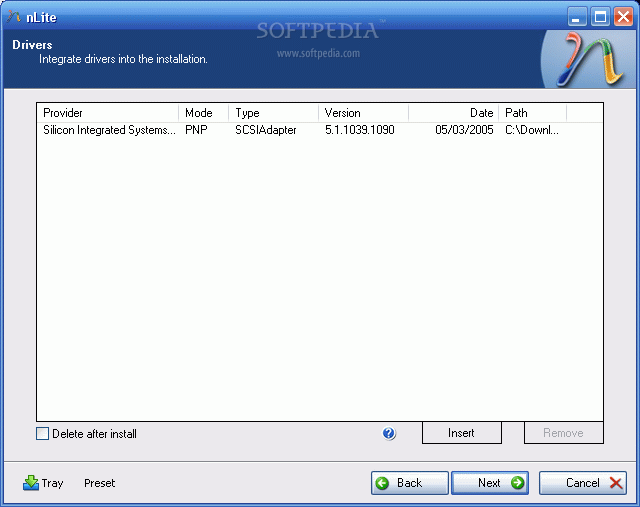
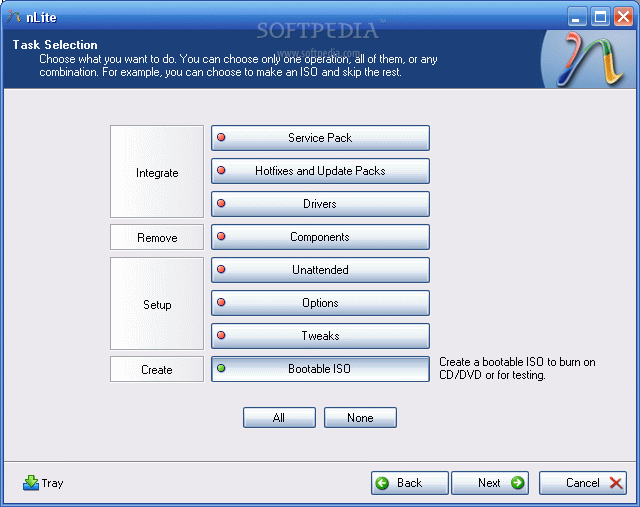
Now, click next twice until you get to a screen where you get options sorted in 4 categories: Integrate, Remove, Setup, Create. We are interested in the integration procedure, therefore select the Drivers button and click next. From the next menu window, click Insert and select multiple drive folder option from the drop down menu. This option permits you to browse to the location where the downloaded drivers are found.


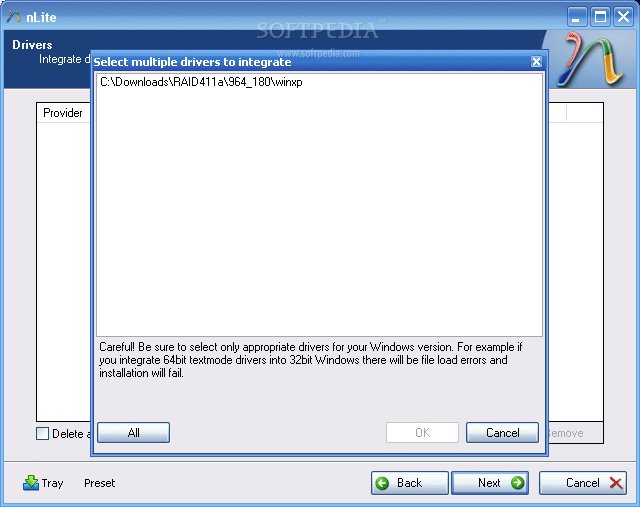
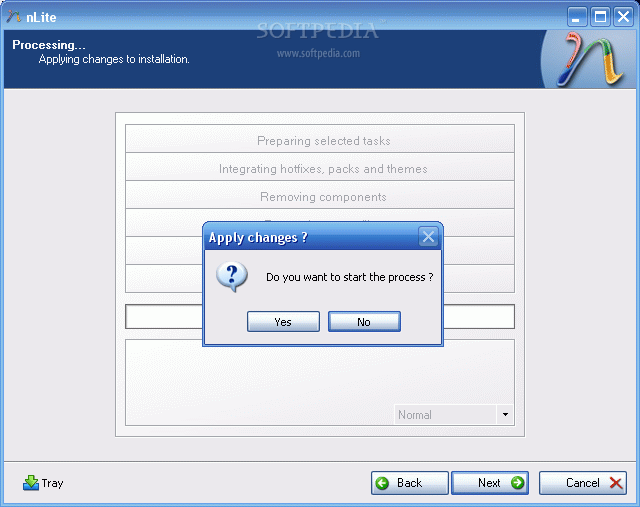
Select the containing directory and click next. You will get a list with the available drivers (in case there are more than one) or simply one driver. Select it (them) and click next. Now the application will ask for the permission to start the integration procedure. Choose Yes and wait for the drivers to be inserted into the installation package.
Review imageReview imageReview imageReview imageReview image


Review imageReview imageReview imageReview image


With problematic driver being included in the installation package you can install Windows XP on your SATA HDD...but...the installation package is on the HDD. You need a bootable CD in order to start an installation. Don't worry, once the installation package has been adorned with additional user selected drivers it can be transformed into a bootable disk image and later burned on a CD. To encapsulate the installation into a ISO image use the same Nlite application.


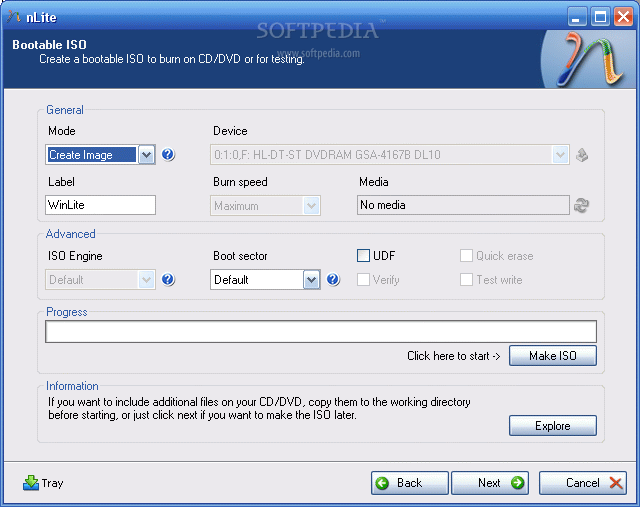
Open it, make sure the HDD installation folder is selected and click next. Select "Last session" preset and click next again. Now from the options menu choose Bootable ISO and click next. In the following window, make sure that the mode is set to "Create Image" and click Make ISO. A destination folder is required where the resulting ISO image will be saved. Once the image saving process finished you have the freedom to burn it on a blank CD with whatever you favorite CD burner software may be.
Review imageReview image


The new CD will be the twin copy of the Windows Installation CD but with one difference, it includes the SATA driver.

newer post

Microsoft DOS attrib command

0 comments
About attrib

Attrib allows a user to change the properties of a specified file. Using attrib, the user has the capability of changing the file to have any of the below attributes. Note if you're wanting to change the ACL's of a file see the CACLS command.
Read-only - allowing the file to be only viewed and not written to.
Archived - allowing Microsoft backup and other backup programs to know what files to backup.
Hidden - making the file invisible to standard users.
System - making the file an important system file.

Syntax
Microsoft Windows 95, 98, and ME syntax
Displays or changes file attributes.
ATTRIB [+R | -R] [+A | -A] [+S | -S] [+H | -H] [[drive:][path]filename] [/S]
+Sets an attribute.
-Clears an attribute.
RRead-only file attribute.
AArchive file attribute.
SSystem file attribute.
HHidden file attribute.
/SProcesses files in all directories in the specified path.
Microsoft Windows 2000 and Windows XP syntax
Displays or changes file attributes.
ATTRIB [+R | -R] [+A | -A ] [+S | -S] [+H | -H] [[drive:] [path] filename] [/S [/D]]
+Sets an attribute.
-Clears an attribute.
RRead-only file attribute.
AArchive file attribute.
SSystem file attribute.
HHidden file attribute.
/SProcesses files in all directories in the specified path.
/DProcess folders as well.
Microsoft Windows 2000 and Windows XP recovery console syntax
Note: The below options are the available options in the Windows recovery console.
Changes attributes on one file or directory.
ATTRIB -R | +R | -S | +S | -H | +H | -C | +C filename
+Sets an attribute.
-Clears an attribute.
RRead-only file attribute.
SSystem file attribute.
HHidden file attribute.
CCompressed file attribute.
Examples
attrib
Typing attrib by itself will display all files in the current directory and each of their attributes. If any file is hidden it will also display those files.
attrib +r autoexec.bat
Add the read-only attribute to the autoexec.bat file so it cannot be modified until the read only attribute is taken off. This is helpful for important system files or any other file that you do not want to have mistakenly edited or changed by another program.
attrib +h config.sys
Add the hidden attribute to the config.sys file causing it to be not be seen by the average user.
attrib -h config.sys
This command will do the opposite of the above command. Instead of hiding the file it will unhide the file if hidden.
  • Additional examples and information about displaying hidden files in MS-DOS can be found on document CH001039.
Extended information
See our File attributes computer dictionary definition for additional information about file attributes. DOS directory file attribute bit position and Hex Value with bit positions (7 6 5 4 3 2 1 0).
Bit PositionsHexDescription
0 0 0 0 0 0 0 101hRead Only file
0 0 0 0 0 0 1 002hHidden file
0 0 0 0 0 1 0 004hSystem file
0 0 0 0 1 0 0 008hVolume Label
0 0 0 1 0 0 0 010hSubdirectory
0 0 1 0 0 0 0 020hArchive
0 1 0 0 0 0 0 040hReserved
1 0 0 0 0 0 0 080hReserved
Examples

0 0 1 0 0 0 0 121hRead Only, Archive
0 0 1 1 0 0 1 032hHidden, Subdirectory, Archive
0 0 1 0 0 1 1 127hRead Only, Hidden, Archive


http://www.computerhope.com/attribhl.htm
newer post

Virtual Private Network (VPN) Configuration

0 comments

 http://www.csm.ornl.gov/~dunigan/gifs/vpn.gif


 Introduction

Virtual Private Networks (or VPN) are used to set up secure communications between hosts on a public network (such as the Internet). There are many ways of accomplishing this, and several technologies that facilitate it.
This document deals with using VPN software at Suffield Academy. We provide VPN servers so that faculty and students may connect from off-campus through our firewall and access services that normally would be inaccessible to them. For example, users can connect to our file server (to access their documents), or to the database server (to view records).
At the moment, we provide both L2TP and PPTP VPN services, which are compatible with the majority of VPN clients.
Before you begin, please make sure you know your Network Username (such as "jbogus" or "01abc"), and the corresponding password. You'll need this information in order to connect through our VPN server.

Mac OS X

(This section not yet completed)
This section will detail downloading the Internet Connect configuration file, installing it, and connecting to the VPN.

Windows XP

Windows XP comes with a built-in VPN client that can be used to connect to our network. To set up this client, follow the steps below.
Note that you only need to set up the client once. After the initial setup, you can easily connect using your saved settings.

Configuring the Client

Begin by going to the Control Panel in Windows XP.

If you see a choice that says Network and Internet Connections and looks like the image below, click on it.


Now, open the Network Connections option:


You should now be at a screen that looks like this:


Click on the Create a new connection choice on the left. You'll be shown the following screen:


Choose Next. You'll now be given a list of choices.


Select Connect to the network at my workplace and click Next. You'll now be asked to choose between dial-up and VPN:


Choose Virtual Private Network connection and click Next.
You'll now be asked to enter a company name. Enter anything you like (for example, "Suffield Academy"):


Click Next. You will now be asked to enter the VPN server. You must enter a server depending on whether you are a student or a faculty member.
Students must enter vpn-student.suffieldacademy.org as the address to connect to.
Faculty must enter vpn-faculty.suffieldacademy.org as the address to connect to.
Note: you must enter the proper address for the type of user you are, or it will not work!

Click Next. The system will confirm the addition of the connection, and you may now click Finish.

Using the VPN

In the Network Connections control panel, double-click your new VPN settings icon:

The connection screen will ask you for a username and password. Enter your network username and password, and then click the Connect button.

The system will connect to the VPN server. Upon completion of the connection, a small popup window will appear to alert you that the network is ready for use:

You may now work on the Suffield Network as if you were on campus.
When you're done working, click on the small computer icon in the system tray to get the status window for the connection:

Click the Disconnect button and the VPN will terminate. You are now disconnected and may use your machine normally.
newer post

Submit your website to Search Engine and Get visitor

0 comments

Submit your just made website to search engines and get more visitors to your website. Here is a list of search engine. You can submit your page by clicking manually.
Search Engine/
Directory
Alexa Traffic Rank Google Page Rank
  • 1
  • 26
  • 704
  • 3,006
  • 3,220
  • 5,508
  • 7,852
  • 9,031
  • 13,005
  • 13,824
  • 14,472
  • 15,635
  • 15,978
  • 16,783
  • 19,878
  • 20,413
  • 20,539
  • 20,657
  • 21,434
  • 21,645
  • 21,712
  • 22,744
  • 22,842
  • 23,185
  • 23,242
  • 9
  • 8
  • 8
  • 6
  • 6
  • 5
  • 3
  • 4
  • 0
  • 5
  • 5
  • 5
  • 5
  • 4
  • 5
  • 4
  • 3
  • 4
  • 4
  • 5
  • 5
  • 4
  • 3
  • 4
  • 4
Search Engine/
Directory
Alexa Traffic Rank Google Page Rank
  • 23,902
  • 23,907
  • 24,045
  • 24,057
  • 24,883
  • 26,218
  • 26,581
  • 26,715
  • 26,729
  • 26,781
  • 27,365
  • 27,486
  • 27,737
  • 28,110
  • 28,412
  • 30,002
  • 30,280
  • 30,626
  • 33,854
  • 33,877
  • 35,027
  • 35,436
  • 38,165
  • 40,253
  • 41,095
  • 6
  • 2
  • 4
  • 4
  • 4
  • 3
  • 3
  • 3
  • 3
  • 5
  • 5
  • 4
  • 3
  • 5
  • 4
  • 2
  • 5
  • 4
  • 4
  • 3
  • 3
  • 6
  • 3
  • 3
  • 4
newer post

Saturday, February 5, 2011

How to Install Windows XP

0 comments

Install Windows XP

Windows XP is the most popular computer operating system. Some time we need to install operating system. But general user can't do that.

This post will help to install xp in your pc personally. Before install XP you need to setting up Boot sequence in BIOS. Set first boot device as Optical Drive (CD/DVD ROM).

Part 1: Begin the installation
1.Insert the Windows XP CD into your computer and restart your computer.
2.If prompted to start from the CD, press SPACEBAR. If you miss the prompt (it only appears for a few seconds), restart your computer to try again.
Command window with prompt "Press any key to boot from CD"
3.Windows XP Setup begins. During this portion of setup, your mouse will not work, so you must use the keyboard. On the Welcome to Setup page, press ENTER.
Windows XP Professional Setup page
4.On the Windows XP Licensing Agreement page, read the licensing agreement. Press the PAGE DOWN key to scroll to the bottom of the agreement. Then press F8.
Windows XP Licensing Agreement page
5.This page enables you to select the hard disk drive on which Windows XP will be installed. Once you complete this step, all data on your hard disk drive will be removed and cannot be recovered. It is extremely important that you have a recent backup copy of your files before continuing. When you have a backup copy, press D, and then press L when prompted. This deletes your existing data.
6.Press ENTER to select Unpartitioned space, which appears by default.
Windows XP Professional Setup, partitioned and unpartitioned space page
7.Press ENTER again to select Format the partition using the NTFS file system, which appears by default.
Windows XP Professional Setup page with Format the partition using the NTFS file system selected
8.Windows XP erases your hard disk drive using a process called formatting and then copies the setup files. You can leave your computer and return in 20 to 30 minutes.
Windows XP Professional Setup Please wait while Setup formats the partition page
Part 2: Continue the installation
9.Windows XP restarts and then continues with the installation process. From this point forward, you can use your mouse. Eventually, the Regional and Language Options page appears. Click Next to accept the default settings. If you are multilingual or prefer a language other than English, you can change language settings after setup is complete.
Regional and Language Options page
10.On the Personalize Your Software page, type your name and your organization name. Some programs use this information to automatically fill in your name when required. Then, click Next.
Personalize Your Software page
11.On the Your Product Key page, type your product key as it appears on your Windows XP CD case. The product key is unique for every Windows XP installation. Then, click Next.
Your Product Key page
12.On the Computer Name and Administrator Password page, in the Computer name box, type a name that uniquely identifies your computer in your house, such as FAMILYROOM or TOMS. You cannot use spaces or punctuation. If you connect your computer to a network, you will use this computer name to find shared files and printers. Type a strong password that you can remember in the Administrator password box, and then retype it in the Confirm password box. Write the password down and store it in a secure place. Click Next.
Computer Name and Administrator Password page
13.On the Date and Time Settings page, set your computer’s clock. Then, click the Time Zone down arrow, and select your time zone. Click Next.
Date and Time Settings page
14.Windows XP will spend about a minute configuring your computer. On the Networking Settings page, click Next.
Networking Settings page
15.On the Workgroup or Computer Domain page, click Next.
Workgroup or Computer Domain page
Part 3: Complete the installation
16.Windows XP will spend 20 or 30 minutes configuring your computer and will automatically restart when finished. When the Display Settings dialog appears, click OK.
Display Settings dialog box
17.When the Monitor Settings dialog box appears, click OK.
Monitor Settings dialog box
18.The final stage of setup begins. On the Welcome to Microsoft Windows page, click Next.
Welcome to Microsoft Windows page
19.On the Help protect your PC page, click Help protect my PC by turning on Automatic Updates now. Then, click Next.
Help protect your PC page
20.Windows XP will then check if you are connected to the Internet:
If you are connected to the Internet, select the choice that describes your network connection on the Will this computer connect to the Internet directly, or through a network? page. If you’re not sure, accept the default selection, and click Next.
Will this computer connect to the Internet directly, or through a network? page
If you use dial-up Internet access, or if Windows XP cannot connect to the Internet, you can connect to the Internet after setup is complete. On the How will this computer connect to the Internet? page, click Skip.
How will this computer connect to the Internet? page
21.Windows XP Setup displays the Ready to activate Windows? page. If you are connected to the Internet, click Yes, and then click Next. If you are not yet connected to the Internet, click No, click Next, and then skip to step 24. After setup is complete, Windows XP will automatically remind you to activate and register your copy of Windows XP.
Ready to activate Windows? page
22.On the Ready to register with Microsoft? page, click Yes, and then click Next.
Ready to register with Microsoft? page
23.On the Collecting Registration Information page, complete the form. Then, click Next.
Collecting Registration Information page
24.On the Who will use this computer? page, type the name of each person who will use the computer. You can use first names only, nicknames, or full names. Then click Next. To add users after setup is complete or to specify a password to keep your account private, read Create and customize user accounts.
Who will use this computer? page
25.On the Thank you! page, click Finish.
Thank you! page
Congratulations! Windows XP setup is complete. You can log on by clicking your name on the logon screen. If you’ve installed Windows XP on a new computer or new hard disk drive, you can now use the File and Settings Transfer Wizard to copy your important data to your computer or hard disk drive.

newer post

Monday, March 22, 2010

Folder locking freeware List to lock Windows folder with password

0 comments
My Folder
My Folder - Vista Folder Lock
A free windows folder lock program designed to protect your files and folders privacy. My Folder allows you attach password to any windows folder that you on local hard drive. Then a password is required on access attempt to the protected folder. Meanwhile, My Folder lock program can even use on multi user environment and even Folder are locked with password in safe mode or DOS mode.
Download My Folder
Instant Lock – Free File and folder lock freeware
instant lock hide folders
Free locking program that provides password protection on your windows files and folder. Beside locking folder with password, Instant lock even can make folders completely invisible from other users and the protected files are not even accessible from safe mode and DOS prompt. Plus more, it’s a fully portable security program to lock your files and data on portable removable drive and support run on XP and vista.
Download Instant Lock
Microsoft Private Folder
my private folder - free microsoft private folder lock with password
Microsoft Private Folder is a Windows folder password tool to protect your private data. With this folder password locking tool, you will get one password protected folder called My Private Folder in your account to save your personal files.
Download Microsoft Private Folder
Folder Lockbox
Folder LockBox - Free Windows Folder Password locking utility
Folder Lockbox is a folder locking utility that will help you to password protect any folder on your computer. Meanwhile, the protected folder (lockbox) can be hidden from any user and application of your system.
The folder locking program is simple to use. You can set the lockbox location and the password during the setup procedure. After the setup is done, folder lockbox will be hidden and locked until you enter the valid password.
Download Folder LockBox
SonySoft Folder Lock – Simple Windows folder locking utility
Free simple Windows Locking Software
A windows folder locking utility that allows you attach password on windows folders to prevent other viewing your folder files information. Each time you will be prompted for password when open the protected windows folder by SonySoft Folder lock.
Download Sonysoft Folder Lock
So, the folder locking freeware with password protection for sure bring your folder files privacy better and more secure. :)

Source
newer post
newer post older post Home

Delete this element to display blogger navbar